Open top menu
Saturday, March 15, 2014
Neat Things: Stamp Yo Face


Have you ever wanted to immortalize your face on a stamp? Try Stamp Yo Face from the talented team of Hannah (the artist) and Kevin (the muscle).

Each stamp design is hand-drawn and digitized from a photo that you send in once you purchase the stamp (at $65). In addition, they are are also sending you an original hand-drawn portrait  as well as a black ink pad with your purchase.

You might be thinking where you can use a stamp of your face, but there are a few places.
I like the idea of adding it to the reciept ( like in the pic below) for your customers or you can put it on a blank business card and write your info in ( or type it in and just stamp as needed).


Blogger-Signature
Read more
Monday, March 10, 2014
Sam's Favorite Chocolate Cake


I don't know whats sweeter....this cake or the story behind it!


Sweet Enough posted her recipe on Food25 for "Sam's Favorite Chocolate Cake" and in addition to the cake looking awesome, the story behind it is adorable.

Her Story  
 
" I recently reunited with my father after over 40 years, along with a newly discovered 15 year old half-brother, Sam. Their visit fell on Sam’s birthday and so I asked him what his favorite dessert was. In typical teenage fashion, he shrugged, looked down at the ground and said that he didn’t have one. “Come on, Sam,” I said, “everyone has a favorite dessert.” He finally admitted that he liked a chocolate cherry cake his mother used to make for him. As he described the cake, any sign of teen angst melted away. I called his mom and she was kind enough to send her recipe on to me so that I could make it for his birthday. I played around with it, less flour, less sugar, more chocolate, and came up with this. Chocolate cake, it seems, can bridge any distance."


Ingredients                                                                                          
  • 3/4cups cocoa
  • 4 ounces semi-sweet chocolate
  • 2cups boiling water
  • 1cup unsalted butter, at room temp
  • 1 1/2cup sugar
  • 4 eggs
  • 2 teaspoons vanilla extract
  • 2 1/4cups flour
  • 2 scant teaspoons baking powder
  • 1 teaspoon salt
  • 8 ounces semi-sweet chocolate
  • 3/4cups heavy cream
  • 1cup good quality sour cherry jam
  • P.S. You can buy Sour Cherry Jam at any Specialty/ Gourmet Food store, an Eastern ( Polish/German) market or even  Walmart Superstores

    Instructions                                                                                       
    1. Preheat oven to 350° F. Sift the flour, baking powder and salt together and set aside.
    2. Place the cocoa and 4 ounces of semisweet chocolate in a bowl and pour in the boiling water. Stir until all the chocolate is melted. Set aside.
    3. Cream together the butter and sugar until fluffy, about 3 to 5 minutes. Beat in the eggs, one at a time, and the vanilla extract.
    4. Alternate mixing in the dry ingredients and the melted chocolate mixture. Do not over mix.
    5. Pour batter into two 9-inch cake pans and bake for about 20 to 25 minutes.
    6. To make the frosting, pour the cream into a saucepan over a medium heat and stir in the 8 ounces of chocolate. Whisk until smooth and shiny.
    7. Place the jam in a saucepan over a medium heat and stir until it loosens enough to pour it over the cake.
    8. When the cakes are done and cooled invert one on to a plate and spread the cherry jam over it. I find it better to spread the jam over the "bottom" of the cake since it is always flat. place the other cake layer on top and pour the frosting over the whole thing. Decorate with whipped cream and cherries for an extra happy-looking cake.

     Blogger-Signature
    Read more
    Monday, March 3, 2014
    EVER HEARD OF TACKK?


    Ever hear of Tackk? Tackk allows anyone, to create content that combines text, images, audio and video...think Pinterest with audio and video capabilities. You do not have to download anthing or even login if you don't want to, just point and click.

    Tackk is great for businesses since it really is at it's base a flier that one may put up to advertise whatever content you want to get out, but on a digital scale. From business products and craft tutorials to recipes and announcements. Tackk also lets you share your creations with Facebook, Twitter,  Google+, LinkedIn, and ironically even Pinterest,

    So how does Tackk work?

    It’s simple! Go to 
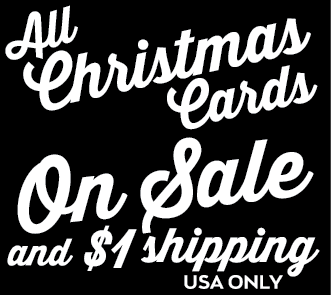
Tackk to create your first board.  Click on "Create New" and a variety of options come for you based on the "intention" of your Tackk.  They range from a Blank Canvase ( pictured below) to food, events, for sale, house, blogpost, announcement and more. Then you can even add images, videos, links, and more! You can even content from your Instagram Account!
    tackk-digital-tool-craft-business-hobby-Crafts-Unleashed-3


    Tackk takes care of the design and gives you a simple, clean interface that you can customize, all you have to do is insert any media you would like to use, change the text, and more. You can use the sidebar panel on the right to change the text size, fonts, colors, and backgrounds . Use the gear menu to change each section of your  and use the big plus sign to add more items, such as headlines, text, photos, videos, maps, and links to other websites.

     Don’t forget to visit the Tackkboard for a alot of other ideas!

    Pros: Easy to create one page "website", embed options, able to add video, instagram pics , find and follow people, tags or a combination of both, able to edit board at anytime and sleek design that is very easy to use.

    Cons: Must create account to edit board or keep board over one week.
      Blogger-Signature
      Read more
      Saturday, March 1, 2014
      SNAP SHOT: STELMAKH STUDIO


      Edward Stelmakh is a photographer out of Samui (Thailand) . He is the the owner of "STELMAKH STUDIO COMPANY LTD" in Thailand and produces these amazing, unique wedding shots.  He just doesn't limit himself to weddings, but all portraits.For more of his work take a gander at his website.                          


      Blogger-Signature
      Read more