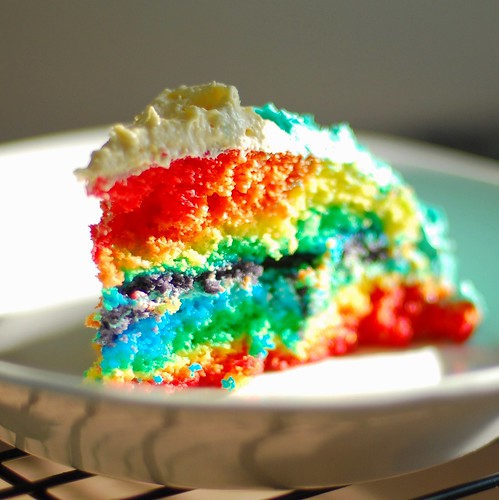
I love those pretty little rainbow cakes :) and though I don't really have an occasion to make them I love seeing others interpretation of them , especially when they are done right.
There are a couple of different ways to make this rainbow cake. One being that you bake each color in a separate pan and the other one is pouring the different batter into the same baking

I prefer the layered seperate pan method (pictured above), but alot of people like the more "marled melted crayon" look like the one to the left. We have given you links to both methods so you can choose which one works better for you. I also think the pastel colors are prettier, which can be achieved by using a limited amount of food coloring...."a little dab will do ya".
Tender Crumb has a wonderful cake recipe that will be great for this layered rainbow cake ( just add the necessary food coloring for each layer)but be mindful of the amount of food coloring, you don't want the cake to be bitter.
Southern Coconut Cake
Makes an 8-inch triple layer cake
Recipe by Tender Crumb
For the cake:
5 large egg whites
½ cup of milk
2 teaspoons of vanilla extract
3 cups of cake flour
2 and 1/3 cup sugar
4 ½ teaspoons of baking powder
½ teaspoon of salt
2 sticks of unsalted butter (8oz.) at warm room temperature
1 cup unsweetened coconut milk
2 ½ cups of sweetened flaked coconut for garnishing cake
-Preheat the oven to 350F degrees. Butter the bottoms of three 8-inch round cake pans. Line the bottom of each pan with a parchment circle and butter the circle.
-Put the egg whites in a bowl and whisk slightly. Add the ½ cup of milk and the vanilla and whisk to mix thoroughly; set aside.
-In a large mixer bowl, combine the flour, sugar, baking powder, and salt. With the mixer on low, beat dry ingredients well in order to break up any lumps. Add the butter and coconut milk on low speed and beat just to combine. Raise the speed to medium and beat until light and fluffy about 2 minutes.
-Add the egg white mixture in 2 or 3 additions, scraping the sides of the bowl after each addition. Divide the batter among the pans.
-Bake for 30 minutes or until a cake taster inserted in the middle comes out clean. Allow the cakes to cool in their pans for 10 minutes. Then turn the cakes out and place on a wire rack to cool completely.
-To assemble the cake, place one layer, flat side up, on an 8-inch cake round. Cover this layer with 1 cup of the buttercream frosting. Spread it evenly all the way to edge of the cake. Then sprinkle ½ cup of shredded coconut on top. Add the second layer and repeat the process. Top with the final layer of cake and frost the top and sides of the cake.
-Place the remaining 1 ½ cups shredded coconut on a large baking tray. Pick up the cake and hold it on the palm of one hand over the tray. Using the other hand scoop up the coconut and press it to the sides of the cake. Continue with this process until the sides of the cake are covered. Set the cake on a serving plate and sprinkle any remaining coconut on top of cake. Chill cake for at least one hour to allow frosting to firm up a bit.
Cream cheese buttercream frosting
12 ounces of cream cheese, slightly chilled
1 stick of butter plus 6 tablespoons of butter (7 ounces) unsalted butter at room temperature
1 cup of confectioners sugar, sifted after measuring
2 teaspoons vanilla extract
1 cup granulated sugar
¼ cup of water
3 egg whites
-Place the cream cheese in the bowl of a mixer and beat on medium speed until slightly fluffy and smooth. Add the butter 1-2 tablespoons at a time, mixing until smooth. Add the confectioner’s sugar and vanilla and mix until fluffy. Set aside at room temperature while buttercream is made.
-Combine the granulated sugar and water in a small heavy saucepan and bring to a boil over medium heat, stirring to dissolve sugar. Continue to cook without stirring until the syrup reaches the softball stage 228 degrees F on a candy thermometer.
-Meanwhile, place the egg whites in mixer bowl and have the mixer ready to go. When the syrup is ready, turn the mixer on med-low and begin mixing the egg whites. Slowly add the hot syrup to the whites taking care not to pour onto the beaters, it may splash. When all the syrup is incorporated, raise the speed on the mixer to med-high and beat the egg whites until mixture has cooled and stiff meringue forms.
-With the mixer on low, begin adding the cream cheese mixture by the spoonful. When all is incorporated, raise the speed to medium and whip until frosting is smooth and fluffy.
________________________________________________________________

For those of you who want the easiest way to make this cake as well as what I call the "marbled" version , head on over to this tutorial by
Omnomican. She made her lovely rainbow cake with the box mix and the "one pan/all color" method. Take note of the special FAQ's at the bottom of her post, which addresses common issues one has with baking this cake. I do want to reiterate one though.....
the more food coloring you use,the bitter it will be. A little goes a long way so have an easy hand when making your colorful concoction.There are actually several recipes and methods that you can use to make these rainbow cakes, but if you are not a great baker you can still achieve this witha minimum of work. Just take the regular box cake, decide what method (layer or marled) to make and add the appropriate food coloring. You can then just buy regular canned frosting to frost the cake. The following are some that I think are good. Look them over and use the ones that work best for you.
REMEMBER: IF YOU ARE DOING THE LAYERED VERSION TO BAKE THE LAYERS THIN, SINCE YOU ARE STACKING SEVERAL TOGETHER....YOU DON'T WANT THE CAKE TO BE TOO TALL.

GREAT RAINBOW CAKE RECIPES:Martha Stewart Rainbow Cake: Good ole' Martha has done it again, take note of the great lemon buttercream icing recipe as well.
Baked Bree- This is a 4th of July , red and blue cake, but it can be adapted for the Rainbow cake.

.png)

 5:09 AM
 0 comments
 5:09 AM
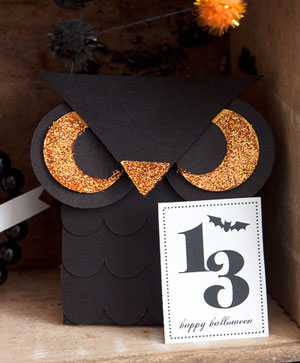 These menacing but cute owl treat box is brought to you by Domestifluff. This DIY box is easy to make and is a great party favor to hold candy or other Halloween goodies.