Open top menu
Sunday, August 29, 2010
RAINBOW CAKE: A RECIPE
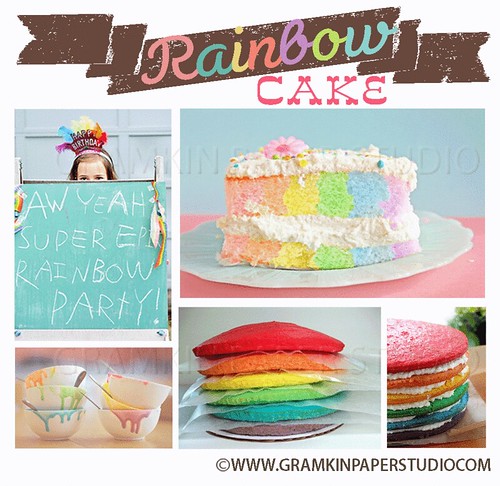
Rainbow Cake copy


I love those pretty little rainbow cakes :) and though I don't really have an occasion to make them I love seeing others interpretation of them , especially when they are done right.
There are a couple of different ways to make this rainbow cake. One being that you bake each color in a separate pan and the other one is pouring the different batter into the same baking
I prefer the layered seperate pan method (pictured above), but alot of people like the more "marled melted crayon" look like the one to the left. We have given you links to both methods so you can choose which one works better for you. I also think the pastel colors are prettier, which can be achieved by using a limited amount of food coloring...."a little dab will do ya".

Tender Crumb has a wonderful cake recipe that will be great for this layered rainbow cake ( just add the necessary food coloring for each layer)but be mindful of the amount of food coloring, you don't want the cake to be bitter.

Southern Coconut Cake
Makes an 8-inch triple layer cake
Recipe by Tender Crumb


For the cake:
5 large egg whites
½ cup of milk
2 teaspoons of vanilla extract
3 cups of cake flour
2 and 1/3 cup sugar
4 ½ teaspoons of baking powder
½ teaspoon of salt
2 sticks of unsalted butter (8oz.) at warm room temperature
1 cup unsweetened coconut milk
2 ½ cups of sweetened flaked coconut for garnishing cake

-Preheat the oven to 350F degrees. Butter the bottoms of three 8-inch round cake pans. Line the bottom of each pan with a parchment circle and butter the circle.
-Put the egg whites in a bowl and whisk slightly. Add the ½ cup of milk and the vanilla and whisk to mix thoroughly; set aside.
-In a large mixer bowl, combine the flour, sugar, baking powder, and salt. With the mixer on low, beat dry ingredients well in order to break up any lumps. Add the butter and coconut milk on low speed and beat just to combine. Raise the speed to medium and beat until light and fluffy about 2 minutes.
-Add the egg white mixture in 2 or 3 additions, scraping the sides of the bowl after each addition. Divide the batter among the pans.
-Bake for 30 minutes or until a cake taster inserted in the middle comes out clean. Allow the cakes to cool in their pans for 10 minutes. Then turn the cakes out and place on a wire rack to cool completely.
-To assemble the cake, place one layer, flat side up, on an 8-inch cake round. Cover this layer with 1 cup of the buttercream frosting. Spread it evenly all the way to edge of the cake. Then sprinkle ½ cup of shredded coconut on top. Add the second layer and repeat the process. Top with the final layer of cake and frost the top and sides of the cake.
-Place the remaining 1 ½ cups shredded coconut on a large baking tray. Pick up the cake and hold it on the palm of one hand over the tray. Using the other hand scoop up the coconut and press it to the sides of the cake. Continue with this process until the sides of the cake are covered. Set the cake on a serving plate and sprinkle any remaining coconut on top of cake. Chill cake for at least one hour to allow frosting to firm up a bit.

Cream cheese buttercream frosting
12 ounces of cream cheese, slightly chilled
1 stick of butter plus 6 tablespoons of butter (7 ounces) unsalted butter at room temperature
1 cup of confectioners sugar, sifted after measuring
2 teaspoons vanilla extract
1 cup granulated sugar
¼ cup of water
3 egg whites

-Place the cream cheese in the bowl of a mixer and beat on medium speed until slightly fluffy and smooth. Add the butter 1-2 tablespoons at a time, mixing until smooth. Add the confectioner’s sugar and vanilla and mix until fluffy. Set aside at room temperature while buttercream is made.
-Combine the granulated sugar and water in a small heavy saucepan and bring to a boil over medium heat, stirring to dissolve sugar. Continue to cook without stirring until the syrup reaches the softball stage 228 degrees F on a candy thermometer.
-Meanwhile, place the egg whites in mixer bowl and have the mixer ready to go. When the syrup is ready, turn the mixer on med-low and begin mixing the egg whites. Slowly add the hot syrup to the whites taking care not to pour onto the beaters, it may splash. When all the syrup is incorporated, raise the speed on the mixer to med-high and beat the egg whites until mixture has cooled and stiff meringue forms.
-With the mixer on low, begin adding the cream cheese mixture by the spoonful. When all is incorporated, raise the speed to medium and whip until frosting is smooth and fluffy.
________________________________________________________________
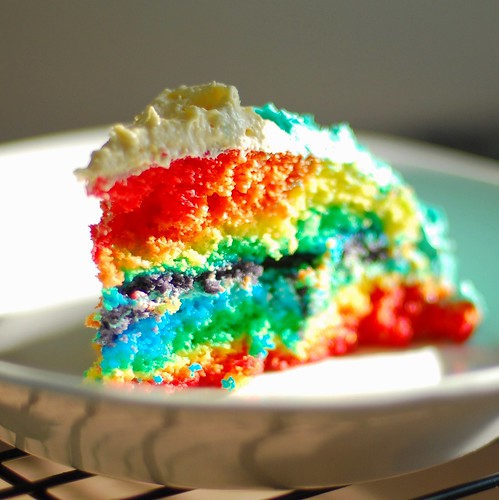
For those of you who want the easiest way to make this cake as well as what I call the "marbled" version , head on over to this tutorial by Omnomican. She made her lovely rainbow cake with the box mix and the "one pan/all color" method. Take note of the special FAQ's at the bottom of her post, which addresses common issues one has with baking this cake. I do want to reiterate one though..... the more food coloring you use,the bitter it will be. A little goes a long way so have an easy hand when making your colorful concoction.

There are actually several recipes and methods that you can use to make these rainbow cakes, but if you are not a great baker you can still achieve this witha minimum of work. Just take the regular box cake, decide what method (layer or marled) to make and add the appropriate food coloring. You can then just buy regular canned frosting to frost the cake. The following are some that I think are good. Look them over and use the ones that work best for you.
REMEMBER: IF YOU ARE DOING THE LAYERED VERSION TO BAKE THE LAYERS THIN, SINCE YOU ARE STACKING SEVERAL TOGETHER....YOU DON'T WANT THE CAKE TO BE TOO TALL.

GREAT RAINBOW CAKE RECIPES:

Martha Stewart Rainbow Cake: Good ole' Martha has done it again, take note of the great lemon buttercream icing recipe as well.
Baked Bree- This is a 4th of July , red and blue cake, but it can be adapted for the Rainbow cake.

Read more
Monday, August 23, 2010
FOODS YOU SHOULD HAVE IN CASE OF EMERGENCY

I know that this is a little "off topic" from the blog, but I found this so interesting when I came across it. Since natural disaster can occur at any time, it never heurst to be prepared in an emergency. Most people think of the staples(batteries, candles, flashlight and so forth) but there are certain foods that the food scientist at Washington State University say you should keep in your pantry for these emergencies.
The following items are good for several reason, one of the biggest reasons is that they have lengthy expiration dates, so you can stash them away for long periods of time. Just make sure to make a list of everything in your stockpile and check expiration dates every 6 to 12 months to keep things fresh. And don’t forget to have a can opener on hand at all times--all that food won’t be of any use if you can’t open it.

LIST OF FOODS TO KEEP FOR EMERGENCIES:
• Peanut butter
A great source of energy, peanut butter is chock-full of healthful fats and protein. Unless the jar indicates otherwise, you don’t have to refrigerate after opening.If you don't like peanut butter, there is also almond butter, but all of this is moot if you are allergic to nuts :P

• Whole-wheat crackers Crackers are a good replacement for bread and make a fine substitute in sandwiches. Due to their higher fat content, whole-wheat or whole-grain crackers have a shorter shelf life than their plain counterparts (check the box for expiration dates), but the extra fiber pays off when you’re particularly hungry. Consider vacuum-packing your crackers to prolong their freshness. I suggest that handheld pump one that doesn't require batteries, and is located in the aisle with the foil and zip lock baggies.

Nuts and trail mixes Stock up on these high-energy foods—they’re convenient for snacking and healthful. Look for vacuum-packed containers, which prevent the nuts from oxidizing and losing their freshness.

Cereal Choose multigrain cereals that are individually packaged so they don’t become stale after opening.

Granola bars and power bars Healthy and filling, these portable snacks usually stay fresh for at least six months. Plus, they’re an excellent source of carbohydrates. “You can get more energy from carbohydrates without [eating] tons of food,” Andress says.

Dried fruits, such as apricots and raisins In the absence of fresh fruit, these healthy snacks offer potassium and dietary fiber. “Dried fruits provide you with a significant amount of nutrients and calories,” Swanson says.

Canned tuna, salmon, chicken, or turkey Generally lasting at least two years in the pantry, canned meats provide essential protein. Vacuum-packed pouches have a shorter shelf life but will last at least six months, says Diane Van, manager of the USDA meat and poultry hotline.

• Canned vegetables
, such as green beans, carrots, and peas When the real deal isn’t an option, canned varieties can provide you with essential nutrients.

• Canned soups and chili Soups and chili can be eaten straight out of the can and provide a variety of nutrients. Look for low-sodium options.

Bottled water Try to stock at least a three-day supply--you need at least one gallon per person per day. “A normally active person should drink at least a half gallon of water each day,” Andress says. “The other half gallon is for adding to food and washing.”

• Sports drinks, such as Gatorade or Powerade The electrolytes and carbohydrates in these drinks will help you rehydrate and replenish fluid when water is scarce.

Powdered milk Almost all dairy products require refrigeration, so stock this substitute for an excellent source of calcium and vitamin D when fresh milk isn’t an option.

• Sugar, salt, and pepper If you have access to a propane or charcoal stove, you may be doing some cooking. A basic supply of seasonings and sweeteners will improve the flavor of your food, both fresh and packaged.

• Multivitamins Supplements will help replace the nutrients you would have consumed on a normal diet.

So take a look in your pantry and see if you are prepare for an emergency. It doesn't have to be a natural disaster to be an emergency, it could be a local power outage, or something small that makes normal living hard.For more information and the whole article go to Real Simple Stockpile. While you're there, take a look at "How to prepare for emergency"
Read more
Thursday, August 19, 2010
BYE BYE ESELLER ADS....WE'LL MISS YOU :(

UPDATE: We got a little message from Handmade Spark after they read our review below and they wanted to tell us that there is no need to "push people" to site as they are a " search engine optimization and social marketing service". The reality is that you do have to let people know you are there....the moniker states "find the people making great handmande things"....you can't find them there if no one knows you are listed. This is what we meant by "pushing people" to the site. You have to let people know where you are and this is just another site, like other social media sites ( facebook, twitter, etc) that you will have to advertise to others. We stick behind our review that the general purpose of this site is different than with the previous Eseller site. Its just up to the user to decide if it will work for their needs.


As some of you may already know, the lovely business tool ESeller Ads will be no more. Eseller Ads ( refer to mine in the lower left hand sidebar) was a way for sellers, whether it be Etsy, Artfire or Ebay, to promote their products with lovely rotating ads. Unfortunately they sent me and all the other users of these ads a notice that they will be shutting down the Eseller Ad site, so that means NO MORE ADS!.
Though this saddens me , the company will be putting all their effort behind there new venture Handmade Spark, this " is a search and seo marketing service that helps Etsy sellers free up time to design and create". Essentially what it is a place where you will get a "carousel ad" divided up by product catagory, that will then go to your "Mini Site" which is a one page site with all your product/company info and links. From there the buyer can then click on the link for your Etsy, Artfire , or what ever seller site you posted.

The up side with this is that for those of you who dont know anything about html and want one easy place to push your traffic, this may be an option....essentially it is an webpage. At the top you will have a little blurb "About Me" then below a mini product showcase that you scroll your mouse over to get the "big picture". Then on the side you have all your links (twitter, shop, facebook, contact me and etc). Also below, if you have a blog, it will post the updates for readers.
This makes it a good option for the "drag and drop" user who just wants something simple and professional.
NOW THE DOWNSIDE.....this is a paid service. It was $12/month, but they have now lowered that to $6/month. For that price you can really get your self a all encompassing website that you have more design control over. You will also need to push people to this site, so if you already have a website or even a domain name this will just be an added expense as well as work to get people to view this page, much like twitter, facebook and etc. You will no longer be able to have those lovely skyscraper ads for your blog either which is also a bummer.

I do love the concept and vision for Handmade Spark, but I wouldn't recommend this (at this stage) to anyone as a viable general business tool like Eseller ads was. I also don't know how many Eseller users actually have made the switch to Handmade Spark, since the overall concept is different than an Eseller user may need.

For more info on Handmade Spark :
http://www.handmadespark.com/blog/today-we-lower-the-price-of-handmade-spark-from-12-per-month-to-6
http://www.handmadespark.com/blog/handmade-spark-we-can-help-you-grow-your-etsy-business
http://www.handmadespark.com/blog/top-ten-reasons-why-handmade-spark-is-good-for-your-etsy-business
Read more
Saturday, August 14, 2010
BORAX USES: A TUTORIAL


So you have got the remains of box of Borax that you bought for a project and you want to use the left overs? There are alot of things that you can do with the Borax and we have just give you a few of the more popular (and sometimes fun) ones.

Borax , or sodium borate, is a naturally occurring alkaline mineral first discovered over 4000 years ago. It has no toxic fumes and is safe for the environment. Borax can irritate skin and should not be ingested.
In addition to being a great cleaner (Add one-half cup Borax, one-half teaspoon Dawn Dishwashing Liquid, and one teaspoon ammonia to two gallons warm water) and great deodorizer, the following are two great uses for the leftover Borax
____________________________________________________
BORAX SLIME: (can be stored in a plastic baggie or air tight container)

INGREDIENTS:

  • borax powder
  • water
  • 4 ounce (120 ml) glue (e.g., Elmer's white glue)
  • teaspoon
  • bowl
  • jar or measuring cup
  • food coloring (optional)
  • measuring cup


INSTRUCTIONS:
  1. Pour the glue into the jar. If you have a big bottle of glue, you want 4 oz or 1/2 cup of glue.
  2. Fill the empty glue bottle with water and stir it into the glue (or add 1/2 cup of water).
  3. If desired, add food coloring. Otherwise, the slime will be an opaque white.
  4. In a separate, mix one cup (240 ml) of water into the bowl and add 1 teaspoon (5 ml) of borax powder.
  5. Slowly stir the glue mixture into the bowl of borax solution.
  6. Place the slime that forms into your hands and knead until it feels dry. (Don't worry about the excess water remaining in the bowl.)
  7. The more the slime is played with, the firmer and less sticky it will become.
  8. Have fun!
  9. Store your slime in a zip-lock bag in the fridge (otherwise it will develop mold)
TO MAKE GLOW IN THE DARK SLIME: just add 1 tsp of glow-in-the-dark paint to the 50% glue and 50% water mixture. Stir together the glue, water and paint till it was well mixed. Then add the borax solution (water and borax). Also another good Youtube Video made by High School Students if you need a visual.

TIPS:
  1. Use white glue, such as Elmer's brand. Most 'school glues' do not have the correct composition.
  2. Don't eat the slime - it isn't especially toxic, but not good for you either!
  3. Slime cleans up pretty easily. Remove dried slime after soaking with water.
  4. There is a step-by-step video instructions if you would like to see this project in action plus a YouTube video of the slime showing what you will get if you use glue gel rather than white glue. Either type of glue works well.
____________________________________________________
BORAX FLOAM: is like slime with polystyrene beads in it, that kids can mold into shapes. You can sculpt with it or use it to coat other objects. You can store it to reuse it or allow it to dry, if you want permanent creations.


INGREDIENTS:

  • 2 tsp. borax
  • 1/2 cup water
  • 1/4 cup white glue (e.g., Elmer's)
  • 1/4 cup water
  • food coloring
  • resealable plastic bag
  • 1 1/3 c. polystyrene beads
INSTRUCTIONS:
  1. Dissolve 2 tsp. borax completely in 1/2 cup (4 oz.) water. (2 tsp. of borax will produce a stiff product. If you want slimier, more flexible 'Floam', then try 1 tsp. borax instead.)
  2. In a separate container, mix 1/4 cup (2 oz.) white glue and 1/4 cup (2 oz.) water. Stir in food coloring.
  3. Pour the glue solution and the polystyrene beads into a plastic bag. Add borax solution and knead it until it's well mixed. Use 1 T. of the borax solution for a very fluid Floam, 3 T. for average Floam, and the entire amount for stiff Floam.
  4. To keep your Floam, store it in a sealed bag in the refrigerator (discourages mold). Otherwise, you can allow it to dry into whatever shape you have chosen.
TIPS:
  1. How it works: borax reacts to crosslink the polyvinyl acetate molecules in the glue. This forms a flexible polymer.
  2. If you use a 4% solution of polyvinyl alcohol instead of glue, you will get a more transparent product that will hold shapes better.
  3. Polystyrene beads can be found at craft stores (e.g., Michaeals, JoAnn Fabrics), usually as fillers for bean bags or dolls. You can grind Styrofoam™ cups using a cheese grater, if you can't find the beads or just have some extra cups laying around. I would suggest using a separate grater than the one you use for food.
____________________________________________________
BORAX LAUNDRY SOAP: (can be stored in a tight container)

INGREDIENTS:

  • 12 cups Borax
  • 8 cups Baking Soda
  • 8 cups Washing Soda
  • 8 cups Bar soap (grated)

INSTRUCTIONS:

  1. Mix all ingredients well and store in a sealed tub
  2. Use 1/8 cup of powder per full load
TIPS:
  1. This works out to about 10 cents per cup
  2. I like the smell of DOVE, so that is a good "Bar Soap" to use..or use any of your favorite soap
  3. Check out this link for other "Soap Recipes"
___________________________________________________
Borax Powder can be found at the following retailers:
  • Wal-Mart
  • Target
  • Kmart
  • Kroger
  • Dollar General
  • Family Dollar
  • ShopRite
  • Walgreens
  • Mejier
  • Publix
  • CVS
  • Food Lion
  • Rite-Aid
  • Winn Dixie
  • Wegmans
  • Stop & Shop
  • Giant Eagle
  • And other local grocery stores in the laundry aisle ( usually they are up high or low on shelf, not at eye level)

soap and laundry soap pic courtesy of mygirlthursday
Read more
Thursday, August 5, 2010
CUPCAKE IN A JAR: A TUTORIAL

When I came across this item, I almost started to weep uncontrollably...thats because its Cupcakes in a Jar!. This little ditty is from the lovelies over at Cakies with a red velvet cupcake taking center stage.
Adapted from a Paula Dean recipe, Cakies tweaked the recipe for their own use:

{CAKIES RED VELVET CUPCAKES}
Ingredients:
- 2 1/2 cups all-purpose flour
- 1 1/2 cups sugar
- 1 tsp baking soda
- 1 tsp salt
- *2 1/4 tsp cocoa powder
- *1 1/2 cup canola oil
- 1 cup buttermilk, room temperature
- 2 large eggs, room temperature
- 2 tbsp red food coloring
- 1 tsp white distilled vinegar
- *2 tsp vanilla extract for the cream cheese frosting:
- 1 pound cream cheese, softened
- 2 sticks butter, softened
- *2 tsps vanilla extract
- 4 cups sifted powdered sugar

FOR THE FULL TUTORIAL GO TO:
CAKIES CUPCAKE IN A JAR

You can really make any kind of cupcakes you would like, its just the red and white colors of the red velvet and frosting are a nice contrast. But, I can really see this with Carrot Cake Cupcake and sour cream frosting or Chocolate Cupcake with Buttercream frosting....just any cupcake that has a nice color contrast between the cupcake and frosting.
Read more