Open top menu
Showing posts with label diy. Show all posts
Monday, November 18, 2013
Best Play Dough Recipe


I am just gonna admit it....I love some playdough, so when I came across a recipe called "The Best Playdough Recipe" , I had to try it and I must say , it is pretty good :)

{INGREDIENTS}

1 C Flour
1 C Water
1/4 C Salt
1 TBSP Vegetable Oil
2 tsp Cream of Tarter
Food Coloring (actual coloring or a kool-aid packet will do)
Sparkles (If you wanna be a fun mom!)
Sauce Pan and Wooden Spoon
Little helping hands.

adelynSTONE, suggest to use less salt as not to dry out the dough and the Cream of Tarter is to hold it all together. I think that it is what makes the dough last. She also put her play dough in "snap" lid babyfood containers,but you can certainly put them in the plastic snap lid containers that you can purchase at any Dollar Store. I also like the pretty pastel colors that she used as these would make great party favors with a customizable label.


Don't forget our other popular post for EDIBLE PLAY DOUGH

Blogger-Signature


For complete tutorial go to adelynSTONE

Read more
Tuesday, July 16, 2013
Washi Tape Wahoo! Cute Things to Washi

In case you didn't already know, crafters and non-crafters alike are obsessed with Washi Tape . This decorative masking tape from Japan has really evolved in design with its growing popularity. There was a time when only a few online retailers had it available  for US buyers, but now , with the influx of alot of other retailers ( and Ebay, lol), the selection of patterns and colors is outstanding . So much so that you will rarely find the same patterns being sold by different retailers.


The following are a few great ideas for using Washi Tape

1.Washi Tape Flag Banner (instructions here or video)


2.Washi Tape Key Board: ( here)
Please thoroughly cleaned the keyboard with rubbing alcohol to remove any dirt or oil that might keep the tape from sticking. Create a template from cardboard to more easily cut the length of tape needed for each key. Snip off the corners to keep them from snagging and peeling off the keys. ( you can easily stick and restick in case you don’t get the placement perfect each time)


 3.Washi Twisty Ties (instructions here)


4.Washi Clothes Pins (instructions here)


5.Washi Magnets (instructions here)


6.Washi Tags (instructions here)


7.Washi Blinds  ( just start tapping)


8.Make your own Washi Tap (instructions here)


9.Organize with Washi: power cords, planters, clips and your appointment book


10.Washi Mani/Pedi


 11.Washi Tape Wall Art (here)


12.Washi Tape Puzzle (instructions here)


Blogger-Signature

Read more
Sunday, June 2, 2013
GRADE SCHOOL NOTE FOLDING: A LITTLE TUTORIAL

I remember the good ole days when you would pass a note to the person you liked or gossip with your BFF . Even though you are no longer in class, you can still keep it old school and send your note with some nostalgic flair. The following are a few creative ways to fold your notes, whether you are putting them in an envelope or handing them off to the person.

Enjoy and Happy Folding!

FULL TUTORIAL HERE

FULL TUTORIAL HERE

FULL TUTORIAL HERE

FULL TUTORIAL HERE


Blogger-Signature
Read more
Monday, October 15, 2012
DIY: Clementine Candle Redux.. Jack-O- Lantern


Recently, BooksNBits took the Clementine Candle Tutorial one step further.
She created a Clementine Jack-O-Lantern for Halloween and it is fantastic.
She posted a video tutorial that you can see below.  The music when trying to light the wick is hilarious.....so make your own Clementine Jack-O-Lantern this halloween!


Go to the :Original Clementine Candle Tutorial


 photo of clementine jack-o-lantern courtesy of shawncampbell
Blogger-Signature


Read more
Sunday, April 29, 2012
Vintage Book Photo Album: D.I.Y


I love vintage and this lovely Vintage Photo Album D.I.Y by Carly Kmyta is fantastic. Made with a few inexpensive items ( old book, scrapbooking photo corners and a sheet of alphabet stickers), this is a great "recycle" project and easy to make.


For the full tutorial go to Carly Kmyta
Blogger-Signature
Read more
Sunday, October 23, 2011
no image

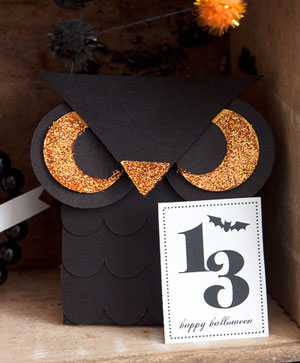
These menacing but cute owl treat box is brought to you by Domestifluff. This DIY box is easy to make and is a great party favor to hold candy or other Halloween goodies.
The great thing about this box is that you can easily make the owls different colors.Instead of using just plain black or another solid color, try mixing it up. Make your owl with one row of an alternate color, like brown with scalloped row of cream.
(for complete tutorial with pics please visit Domestifluff)

{SUPPLIES}:


  • Mini Owl Treat Box Template


  • black and orange cardstock(as pictured) or any color of cardstock you would like to make owl in


  • A stylus, ruler, and small cutting mat for scoring the box template (optional)


  • craft scissors


  • glue dots and double-sided tape


  • school glue


  • a small paintbrush


  • a paper plate or piece of paper


  • glitter ( Martha Stewart Fire Opal Pictured)
{INSTRUCTIONS}:

1. Print the templates onto cardstock. Page one of the template contains everything that will need to be printed on black; page two contains the beak and eye center pieces, which are printed on orange. Cut out all of the template pieces and, as shown in the picture, assemble the eyes and attach the beak to the horns using glue dots. Assemble the box according to the instructions found in the template file.


2. As shown in the picture, attach the feather ruffles to the box using glue dots or double-sided tape.


3. Using a small paintbrush and school glue, cover the beak in glue. Immediately sprinkle the glitter over the beak until it’s completely covered, and allow excess glitter to fall onto a paper plate or piece of paper below. Tap off any remaining excess glitter, and set aside to allow the glue to dry completely.


4. Paint the eye center with glue, and use the technique in step 3 to complete the glittering process. Repeat for the second eye.


5. After the glue on the beak and eyes has dried completely, attach the eyes to the beak/horn piece using glue dots or double-sided-tape.


6. Attach the completed face piece to the front flap of the box using glue dots or double-sided tape. Fill with treats, and seal the box shut using glue dots, double-sided tape, or even a small piece of velcro.


owl picture courtesy of domestifluff
Read more
Thursday, July 28, 2011
no image

::::::::::SUPPLIES::::::::::


1. Mini 3″ Candle Sticks made by Lara Crafts


2. 3″ Wooden Unfinished Circles by Lara Crafts

3. Wood Glue


4. Spray Paint ( any color), Rust-Oleum from Home Depot


::::::::::INSTRUCTION::::::::::


1. Take one candle stick and one circle and place a little wood glue around the rim of the candle stick and adhere the circle in the center.


2. Let them dry for 24 hours before you handle them.


3. Spray painted in the desired color, but I am sure you could use craft paint on them if you prefer that method. You may have to do more than 1 coat.


please note: They carry the Lara Craft brand of wood at Michael’s and other craft stores, but you may not be able to find it at your local Michael’s store.


pictures and instruction courtesy of Modern Moments Designs,
Read more
Sunday, May 15, 2011
DIY: Clementine Candle

This great little Clementine Candle tutorial , from Apartment Therapy, is a great way to easily make a candle, without all the mess.

{INGREDIANTS}
•1 clementine
• olive oil
• 1 sharp paring knife
• many matches

Slide Show Tutorial From Apartment Theraphy


NOTE: The tough part is getting the "wick" to light. You really need a nice bit of clementine "flesh" sticking up in the middle, which you then soak for a minute in the olive oil. If your clementine doesn't have any flesh in the middle OR if you rip it, you'll need to start with another one.

Read more
Monday, May 9, 2011
Sunday, March 27, 2011
Tuesday, January 18, 2011
DIY CALLIGRAPHY: A TUTORIAL


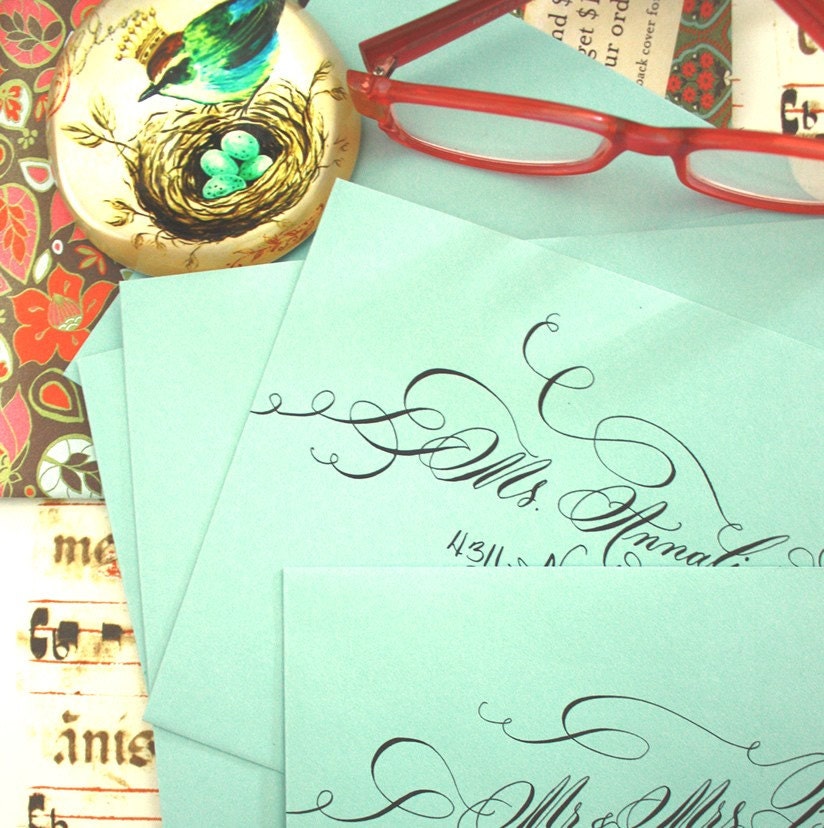
I have always had a secret obsession with calligraphy , especially those artist like eDanae, who still use the old-world method of steel-nib dipped in ink to produce these gorgeous products as pictured on the left. But, sadly, if you are lacking the steady hands or patience that a calligrapher needs...or your penmanship just sucks, there are options out there for those D.I.Y'ers.

The D.I.Y calligraphy tutorial is brought to you by Instructables. This method lets you create beautiful calligraphy with a minimal amount of stress and annoyance. For the full tutorial please visit the original post at Industructables.

All you need is a:
-printer
-envelopes(or whatever product you are using)
-removable scotch tape
-calligraphy ink
-calligraphy dipping pen

*LOOKING FOR A GREAT CALLIGRAPHY FONT? Try "Miss Brooks"
(click on font name to download)
PLEASE NOTE: you can buy calligraphy supplies from Dick Blick or any art supply store.
Helpful Hint: If you are putting calligraphy on envelopes, use Scotch Removable Tape and tack the envelope down with two pieces before you run it down the printer. This reduces the risk of the envelope flap jamming the printer.


picture courtesy of eDanae
Read more
Wednesday, September 15, 2010
EASILY MAKE YOUR OWN STAMP: A TUTORIAL

Branding your company or even just making your packaging unique is a constant learning experience. In a previous Post " Tag It : Your Creative Packaging" we talked about different low cost ways to make your packages lovely and of course, we touched on stamps.
Company stamps are a great and easy way to brand your company on packaging, but what if you wanted alot of different stamps designs but cant purchase them all?....make them
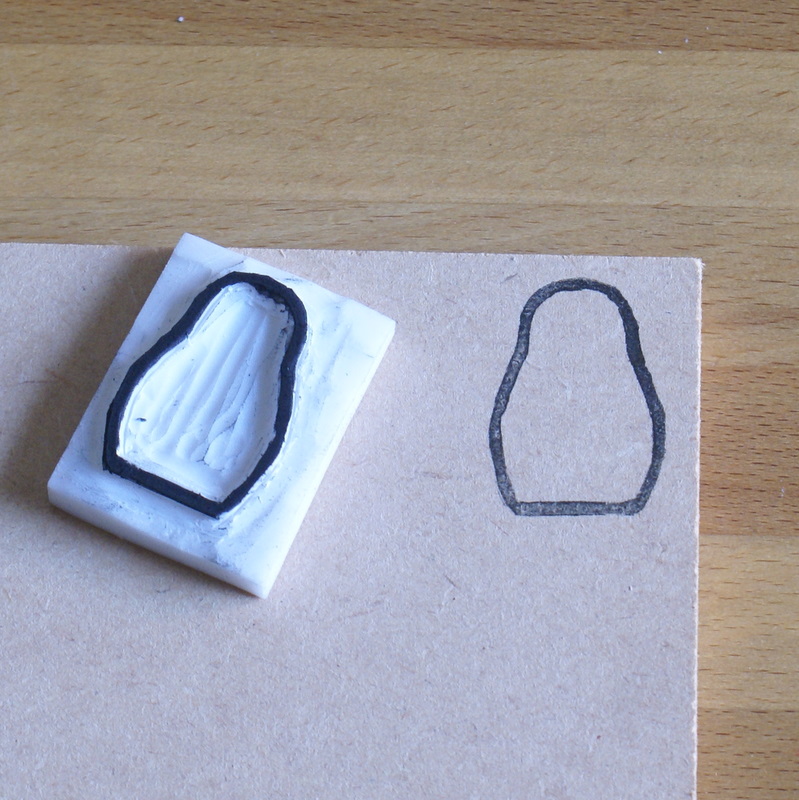
Make Your Own Stamp Tutorial from Art Mind, is a nice step by step pictorial on how to make them.


You will need a view easy to find tools:
  • lino cutting set (to cut out design)
  • pencil (to draw your design)
  • sharpie marker (to outline your design)
  • ink (to stamp)
  • Gum
Notes & Resources:
Lino Cutters
  • You can get Lino Cutters from a Variety of places like Here and Here
  • You should get the set that comes with a variety of heads as opposed to just one
  • This will give your more tools for better precision, on those finer cuts in corners
Rubber Stamp Gum


  • Can be bought by the sheet and then cut down to size. This is good for stamps of various sizes that you may want to do.

  • BUT ALSO TRY GUM ERASERS (also called "Soap" Erasers), these blocks are the perfect size for stamps and because they are thicker in depth, you will not need to mount them onto wood or etc. Just remember to check the size of the gum eraser to make sure it is big enough for your needs

  • Just remember its better to make it bigger and cut is down, then the other way around.

  • Gum Erasers can be purchased by the box at : Jerry's, Amazon, Artist Supply, School Specialty


    ALSO, if you really don't feel like purchasing the "Gum Erasers" you can use a Cut Potato....yes I did say a Potato. Remember how big the Potato Stamp Crafts were back in the 70's? lol. The only problem is that is will not last forever, but if put in the fridge a little longer than left out.
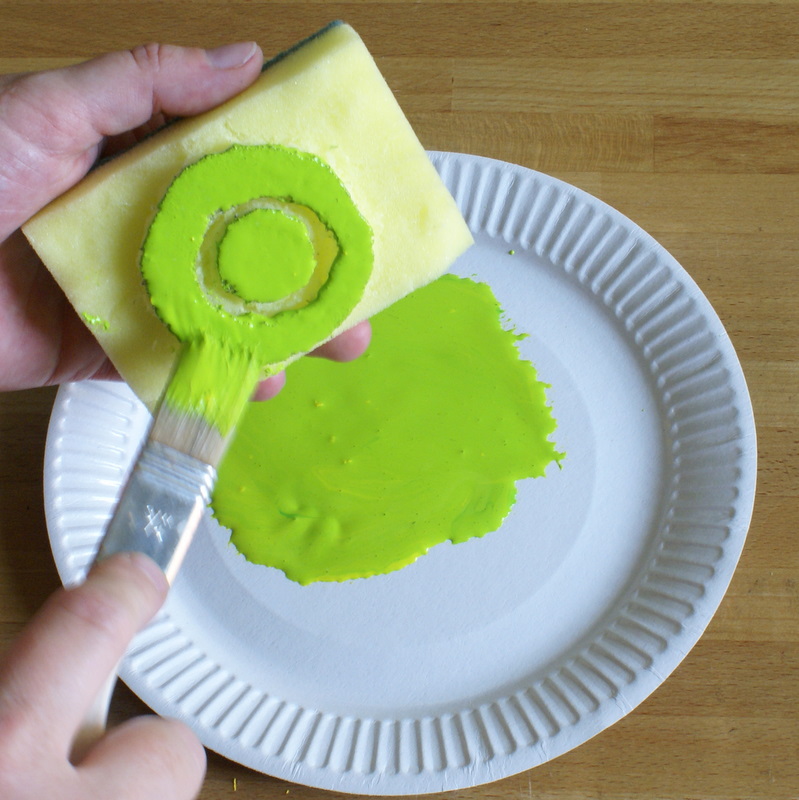
    OR you can use a Foam Sponge, like the ones that you use to wash your dishes. Easily found in the dish washing isle in the supermarket or to buy in bulk try the Dollar Store. To cut foam sponge use an Exacto Knife instead of Lino Cutters.
    Just remember that the Sponge Stamp applies ink differently than a solid Gum Rubber Stamp, just try different applications out to find what method works best for you.


stamp and foam picture courtesy of Art Mind

Read more
Saturday, September 4, 2010
TOOTH PILLOW: A TUTORIAL

When I saw this , I thought it was a little creepy as well as cute. Think about it...you are sleeping and look up to this giant , smiling, tutu wearing tooth...it can be a little creepy, BUT this is cute as well.
This is brought to you via mmmcrafts, and she actually did two versions, a ballerina for a girl and policeman for a boy. This little craft is very easy, even for people who don't sew and it takes very little supplies. The nice thing about this is that if you dont like the ballerina theme, you can really customize it to your taste (cowboy,princess, or just plain). I think you can even "scale" this up, to make a giant tooth pillow( but the thought of that staring at me from the couch gives me the willies).Thought this is hanging, you can definitely take out the ribbon to make it a pillow that you just lay down..so have fun making your tooth pillow :)


There are many different versions that can be made with the basic tooth pillow template, mmmcrafts has made many versions for her site, so play around and come up with your own...I am waiting to see the Cowboy Version, lol


TOOTHPILLOW TUTORIAL
TOOTHPILLOW TUTORIAL UPDATE
POLICEMAN THOOTH PILLOW
Read more
Thursday, August 5, 2010
CUPCAKE IN A JAR: A TUTORIAL

When I came across this item, I almost started to weep uncontrollably...thats because its Cupcakes in a Jar!. This little ditty is from the lovelies over at Cakies with a red velvet cupcake taking center stage.
Adapted from a Paula Dean recipe, Cakies tweaked the recipe for their own use:

{CAKIES RED VELVET CUPCAKES}
Ingredients:
- 2 1/2 cups all-purpose flour
- 1 1/2 cups sugar
- 1 tsp baking soda
- 1 tsp salt
- *2 1/4 tsp cocoa powder
- *1 1/2 cup canola oil
- 1 cup buttermilk, room temperature
- 2 large eggs, room temperature
- 2 tbsp red food coloring
- 1 tsp white distilled vinegar
- *2 tsp vanilla extract for the cream cheese frosting:
- 1 pound cream cheese, softened
- 2 sticks butter, softened
- *2 tsps vanilla extract
- 4 cups sifted powdered sugar

FOR THE FULL TUTORIAL GO TO:
CAKIES CUPCAKE IN A JAR

You can really make any kind of cupcakes you would like, its just the red and white colors of the red velvet and frosting are a nice contrast. But, I can really see this with Carrot Cake Cupcake and sour cream frosting or Chocolate Cupcake with Buttercream frosting....just any cupcake that has a nice color contrast between the cupcake and frosting.
Read more
Thursday, June 17, 2010
KRAFT PAPER WALLET: TUTORIAL


I came across this "Paper Wallet" via Brother O'Mara and I thought that it was pretty creative as well as easy to make. It literally takes one sheet of 8.5" x 11" paper and a piece of tape to make this. The nice thing also is that you are not just limited to paper (or kraft paper as was used in the pic above). Can you imagine using a nice think canvas texture sheet of paper you can get at the craft store? ....soon you will have your own little wallet shop in your home.

This wallet can hold cash and a couple of credit cards, so try one today, whether for yourself or as a gift ( I would also suggest putting some money in it if giving it as a gift, lol.....no really)

PAPER WALLET INSTRUCTIONS
HOWCAST VIDEO (FOR EXTRA HELP IF NEEDED)
Read more
Monday, April 12, 2010
MAKE A SCRATCH OFF LOTTERY TICKET: A TUTORIAL


Now anyone who has ever played the lottery knows how fun they are . There is nothing more satisfying than the instant gratification or sadness a scratch off ticket can bring, lol....so when I came across this little Scratch Off Lottery Ticket Tutorial from Art Mind, I thought it was a great little project to do.
These would be prefect for party favors or party game.......with the winner getting some sort of prize. And with the "Do It Yourself" element of this, you can easily personalize this to whichever occasion needed.


picture courtesy of Art Mind

Read more
Tuesday, January 5, 2010
FREEBIE DAY: Printable Banner


Banners make a very big impact at any function, from your craft show to your own special event.
This pretty banner project is brought to you courtesy of Martha Stewart. These are 3" circles that can be cut out by hand ( which takes longer) or you can obtain a 3" punch, like the Uchida paper punch. You can also resize ( if you are crafty) for smaller or larger punches. You then punch holes and thread with ribbon the word of your choice.

NOTE: THIS CAN ALSO BE USED FOR YOUR CRAFT SHOW SHOP BANNER.

Download Link


photo and template courtesy of Martha Stewart Weddings
Read more