
.png)
 By
By  5:09 AM

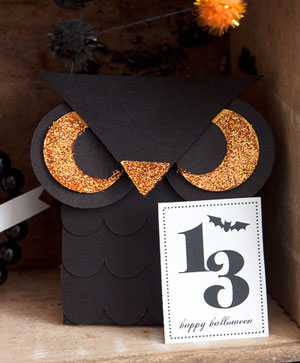 These menacing but cute owl treat box is brought to you by Domestifluff. This DIY box is easy to make and is a great party favor to hold candy or other Halloween goodies.
The great thing about this box is that you can easily make the owls different colors.Instead of using just plain black or another solid color, try mixing it up. Make your owl with one row of an alternate color, like brown with scalloped row of cream.
(for complete tutorial with pics please visit Domestifluff)
{SUPPLIES}:
- Mini Owl Treat Box Template
- black and orange cardstock(as pictured) or any color of cardstock you would like to make owl in
- A stylus, ruler, and small cutting mat for scoring the box template (optional)
- craft scissors
- glue dots and double-sided tape
- school glue
- a small paintbrush
- a paper plate or piece of paper
- glitter ( Martha Stewart Fire Opal Pictured)
1. Print the templates onto cardstock. Page one of the template contains everything that will need to be printed on black; page two contains the beak and eye center pieces, which are printed on orange. Cut out all of the template pieces and, as shown in the picture, assemble the eyes and attach the beak to the horns using glue dots. Assemble the box according to the instructions found in the template file.
2. As shown in the picture, attach the feather ruffles to the box using glue dots or double-sided tape.
3. Using a small paintbrush and school glue, cover the beak in glue. Immediately sprinkle the glitter over the beak until it’s completely covered, and allow excess glitter to fall onto a paper plate or piece of paper below. Tap off any remaining excess glitter, and set aside to allow the glue to dry completely.
4. Paint the eye center with glue, and use the technique in step 3 to complete the glittering process. Repeat for the second eye.
5. After the glue on the beak and eyes has dried completely, attach the eyes to the beak/horn piece using glue dots or double-sided-tape.
6. Attach the completed face piece to the front flap of the box using glue dots or double-sided tape. Fill with treats, and seal the box shut using glue dots, double-sided tape, or even a small piece of velcro.


0 comments