Open top menu
Showing posts with label dessert. Show all posts
Saturday, July 20, 2013
S'mores for Grownups: Gimme S'more..

I am obsessed with S'mores. I could eat them all the time ...of course I would probably give myself diabetes and hypertension, but I would defiantly enjoy it!Most of us do not have a bonfire in the
backyard to get the "authentic " fireside taste, but there are alternative ways to make them.

You can get a S'more Maker like the ones pictures ( you can purchase these and several different models from Amazon.com , thought I like Hershey's S'more maker the best). If you don't want to buy one, yoou can make your own with one sterno in a flower pot ( cut a piece of chicken wire to fit top) or put one sterno in the bottom of a mug and put an apple core utensil ( get one at dollar store or kmart  if you dont already have one ) on top to act as a grate.


 If all of that takes too much effort you can make them in the microwave ( just want them as it only takes a few seconds to melt) or turn on the broiler and set each marshmallow on a graham cracker and broil them until toasty. Then you can flip them over and get the other side toasted, and it will be just like a real campfire marshmallow!


The following are a view really good S'more variations


Pecan S'mores
To prep the pecans, you put pecans in a pan on the stove with a handful of brown sugar. Toast them up on medium heat until the sugar melts and then dump them on a sheet of greased parchment paper. Make some extras, they’re good for munching. 

 Nutella Banana Cream Pie
 Basically this chocolate is substituted for a nice slathering of Nutella. Add a few thinly sliced bananas and voila!

Coconut Cream Pie
Just use instant coconut pudding instead of the chocolate and throw in some sweetened shredded coconut.


French Silk

Just use instant or cooked chocolate pudding instead of the chocolate bar.


Strawberry Rhubarb Pie
Just use Strawberry jam ( not jelly) or any kind of jam you want ....Good variation of this is Grape Jam, Peanut butter and chocolate for a Peanute


Pretzel S'Mores
These are made with regular pretzels instead of 2 grahamcrackers. Thoough I suggest using the flat square pretzel shapes ( pic bottom right) or the reguarl Pretzel Crisps (pic top right) . Both of these you can get in a regular grocery store, though with the Prezel Crisps you may have to go to a specialty one like Whole Foods or Trader Jo's.


 If some of these are a little to "fancy" for you, then try the following updates to the traditional S'More.


Lemon Meringue Pie S’mores: Use lemon pudding or lemon curd, marshmallow & grahamcrackers..taste just like the pie.

Chocolate Covered Strawberry S’mores: Chocolate Grahamcrackers, strawberry marshmallow and dark chocolate.

Cinnamon Roll S’mores: Cinnamon Grahamcrackers, chocolate, cinnamon marshmallows and cream cheese frosting ( in can) in place of the chocoloate bar.

Instead of Graham Crackers, use:
  • Chocolate Graham Crackers
  • Thin Nabisco Chocolate Wafer
  • Jules Destrooper Butter Crisp or any wafer crisp ( I just prefer this brand)
  • Thin Brownies ( can bake a pan from box mix, just layer about 1/2 in thick)

 Instead of plain chocolate/ marshmallow filling, use:
  1. Andes Mint , marshmallow & wafter of choice
  2. Graham crackers, Strawberry slices and dark chocolate
  3. Peanut Butter, Marshmallow and thin Nabsisco Chocolate Wafters
  4. Graham crackers, a Reese's Peanut Butter Cup (or Nutella), sliced banana, and marshmallow.
  5. Gingersnaps ( instead of Graham crackers), a caramel-filled chocolate square, and marshmallow.
  6. Thin cookie ( store bought or homemade) of choice ( prefer Chocolate Chip or Oatmeal-Raisen), chocolate and marshmallow
  7. Peanut-butter cookies with Nutella, sliced banana, and marshmallow.
  8. Bounty or Mounds ( coconut middle) chocolate bar , marshmallows, wafers of choice

Blogger-Signature
Read more
Tuesday, January 10, 2012
Chicken & Waffles Cupcakes with Maple Syrup Frosting

Now when I first saw this recipe via Formal Fringe ,I thought this would rank down there with "Bacon Ice Cream" where it sounds good in theory, but never good in reality.This waffle-inspired yellow buttermilk cupcake is topped with maple syrup buttercream frosting and a mini helping of chicken and waffles....but more importantly the cupcake is infused with a shot of straight-up maple syrup right in the center.

Chicken & Waffles Cupcakes
(Cake adapted from Martha Stewart, with an original frosting recipe, makes 24 cupcakes)

For the buttermilk cakes:

  • 3 cups cake flour
  • 1 ½ cups all-purpose flour
  • ¾ teaspoon baking soda
  • 2 ¼ teaspoons baking powder
  • 1 ½ teaspoons coarse salt
  • 1 cup plus 2 tablespoons (2 ¼ sticks) unsalted butter, room temperature
  • 2 ¼ cups sugar
  • 5 large whole eggs plus 3 egg yolks, room temperature
  • 2 cups buttermilk, room temperature
  • 2 teaspoons pure vanilla extract
  • ½ cup maple syrup

For the maple syrup frosting & topping:

  • 8 tablespoons (1 stick) unsalted butter, softened
  • ½ cup maple syrup
  • 6 cups powdered sugar
  • 24 waffle pieces
  • 24 chicken nuggets
  • maple syrup to drizzle


Make the cupcakes:

  1. Preheat oven to 350°F.
  2. Line two cupcake pans with 24 cupcake liners.
  3. Sift or whisk together both flours, baking soda, baking power and salt.
  4. With an electric mixer on medium-high speed, cream together the butter and sugar until the mixture is pale and fluffy. Reduce the speed to medium and add the whole eggs one at a time, mixing well after each addition. Add the egg yolks and beat until thoroughly combined.
  5. Reduce speed to low and add the flour mixture in three parts, alternating with two additions of buttermilk. Be sure to mix well after each addition.
  6. Beat in the vanilla extract last.
  7. Pour the batter into liners, filling each cup about three-quarters of the way up.
  8. Bake for 20 minutes, or until they pass the toothpick test. Lift them out onto wire racks to cool.

With a food injector, inject roughly one teaspoon of maple syrup into the center of each cooled cupcake.

Make the frosting:

  1. In a small bowl, beat together the butter and syrup until blended. Gradually beat in the powdered sugar until the frosting is smooth. If the frosting is too thick, add just enough maple syrup or milk to thin out the consistency.
  2. Ice and decorate the cupcakes by piping a ring of frosting onto each. With a toothpick or wooden pick, skewer a chicken nugget and waffle piece together, then slide the pick into the top of the cupcake. Drizzle the top with a bit of maple syrup.

For the complete recipe and photo tutorial, go to Formal Fringe
Blogger-Signature
Read more
Monday, June 13, 2011
FROZEN WHITE HOT CHOCOLATE


When ever you hear the words "frozen hot chocolate" you think of the famous Serendipity's in New York, but now some crafty person has figured out how to make them at home ( and for a lot less may we add ,lol)

Frozen White Hot Chocolate (adaped from epicurious)

6 half-ounce pieces of high quality white chocolate
2 Tbs half and half
1 envelope store bought hot chocolate mix
1 tablespoons sugar
1 1/2 cups milk
3 cups ice
Whipped cream (optional)
Chocolate shavings (optional)

{INSTRUCTIONS}
Place the white chocolate pieces and the half and half into a microwave safe bowl. Heat for 1 minutes, stopping to stir half way through. Continue to heat until melted and smooth. Add the cocoa and sugar, stirring constantly until thoroughly blended. Remove from heat and slowly add 1/2 cup of the milk and stir until smooth. Cool to room temperature.
In a blender place the remaining cup of milk, the room temperature chocolate mixture, and the ice. Blend on high speed until smooth and the consistency of a frozen daiquiri. Pour into a cup and top with homemade whipped cream and chocolate shavings.


Read more
Saturday, January 22, 2011
no image


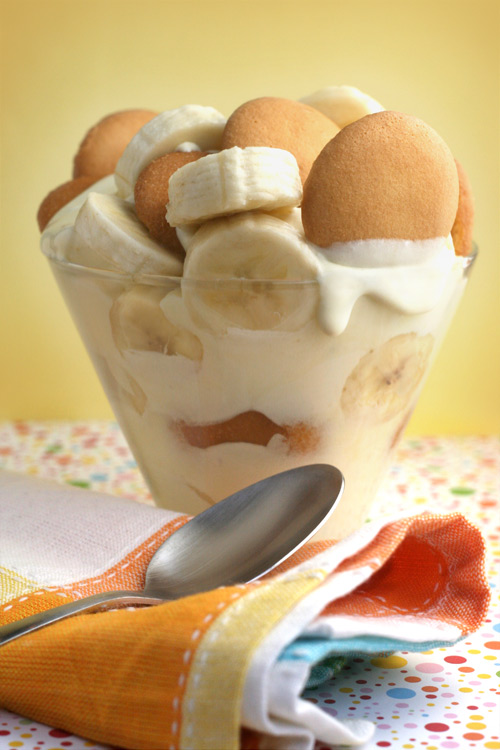
I am the only one that I know who does not like Banana Pudding ( I am allergic to bananas and can't stand them, not even the smell) but it really looks so pretty in the bowl. So far be it from me to deny anyone else, and this reciepe for the always lovely Bakarella looks good .This recipe was taken from the "Great American Favorite Brand Name Cookbook c.1993"

{Cold & Creamy Banana Pudding}

1 (14-ounce) can Eagle Brand Sweetened Condensed Milk
1 1/2 cups cold water
1 (3.5 ounce) package instant pudding and pie filling
2 cups (1 pint) whipped cream, whipped*
36 vanilla wafers
3 medium bananas, sliced and dipped in lemon juice

  • In a large mixing bowl, combine sweetened condensed milk and water.
  • Add pudding mix and beat until well blended.
  • Chill 5 minutes in refrigerator.
  • Fold in whipped topping. (Do this slowly and as few times as you possible to combine, so the mixture will retain its thickness.)
  • Spoon 1 cup pudding mixture into 2 1/2 quart glass serving bowl.
  • Top with 1/3 each of wafers, bananas and pudding. Repeat twice.
  • Garnish as desired.
  • Chill thoroughly. Refrigerate any leftovers.

You can also layer in individual serving dishes.

* I’m not quite clear what “whipped cream, whipped” means, but I just used Cool Whip and let it thaw slightly before I started to fold. It may work even better if you let it thaw in the fridge before using.

FOR THE COMPLETE BAKERELLA BANANA PUDDING RECIPE GO TO BAKERELLA
Read more
Monday, October 18, 2010
PILLOW CAKES: A RECIPE..SO RIDICULOUSLY AWESOME

Just when I thought it couldn't get any better than Cupcake in a Jar, here come PILLOW COOKIES! They are literally cookies stuffed with brownies...excuse me while I cry tears of gratitude.

This recipe(adapted from a recipe in Southern Living) makes these pillows of deliciousness from boxed brownies witha basic chocolate chip cookie recipe, BUT, the possibilities of different variations are endless! Can you imagine, peanut butter cookies with chocolate brownies inside?....ahhhhh.


{Brownie Pillow Cookies}

1 package brownie mix

1 cup butter, room temperature
1 1/2 cups packed light brown sugar
2 large eggs, plus 1 egg yolk
1 tablespoon vanilla
2 1/2 cups all purpose flour
2 teaspoons baking powder
1/2 teaspoon salt
1/2 teaspoon baking soda
12 oz. bag miniature semi-sweet chocolate chips

Make brownies according to package and let cool. Cut about ten 1 inch squares. Enjoy the remaining brownies. (I used a pan about 8 X 8)

  • For the chocolate chip cookie dough, beat butter with a mixer until creamy.
  • Add brown sugar and beat until smooth.
  • Add eggs, yolk and vanilla. Beat until smooth.
  • Combine flour, baking powder, soda and salt in a medium bowl and stir together with a wire whisk.
  • Add flour to butter mixture and beat until combined. Stir in mini chips.
  • Let dough chill covered in the refrigerator for at least an hour.

Preheat oven to 350 degrees.

Use a measuring cup to scoop batter by the 1/2 cup. Since it’s chilled, you may need to pack it with a spoon. Then use the spoon to remove the dough from the cup and place it on parchment paper. Work quickly so the dough remains chilled or either prepare one cookie at a time so the rest of the dough remains cold.

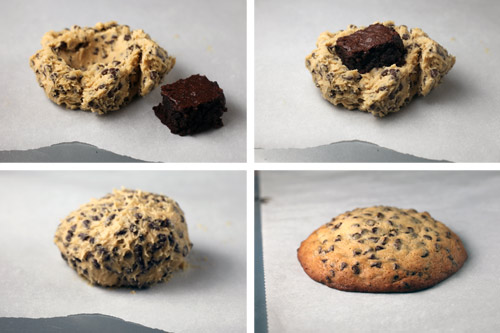
After the dough is on the parchment paper, make an indention and place a 1 inch square brownie in the center. Press the brownie down gently and work the remaining dough around the brownie. You can use your hands to shape the dough into a ball.

During this step, I found it easier to use a piece of parchment paper as a work surface since the dough can get sticky and then I used another piece of parchment paper for the baking sheet. If your dough gets too soft, you can chill the rolled dough balls for a few minutes right before baking.

Prepare six cookies at a time using a large baking sheet (15 X 20) and bake at 350 degrees for about 18 minutes. Return the remaining dough to the refrigerator until time to bake the second batch.

Cool on the baking sheet for a few minutes and then cool completely on a wire rack.

Makes about ten cookies using a little less than a 1/2 cup of dough for each cookie.

If your cookies start to get too brown before they are done baking, you can place a sheet of aluminum foil over top for the last few minutes.

recipe courtesy of bakerella
Read more
Sunday, August 29, 2010
RAINBOW CAKE: A RECIPE

Rainbow Cake copy


I love those pretty little rainbow cakes :) and though I don't really have an occasion to make them I love seeing others interpretation of them , especially when they are done right.
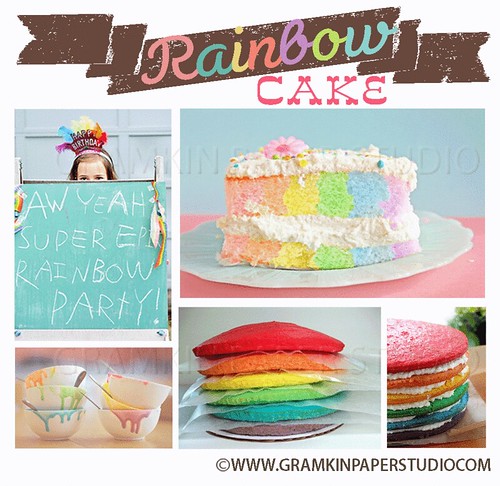
There are a couple of different ways to make this rainbow cake. One being that you bake each color in a separate pan and the other one is pouring the different batter into the same baking
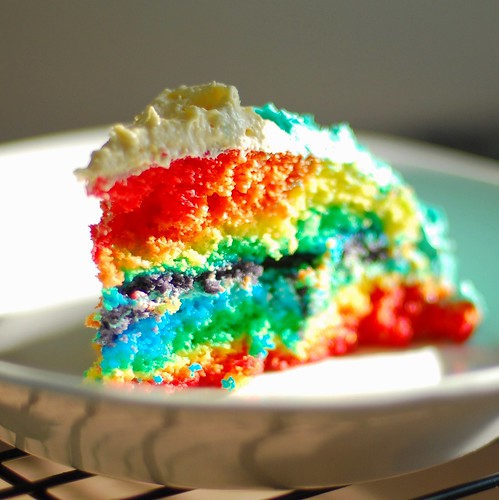
I prefer the layered seperate pan method (pictured above), but alot of people like the more "marled melted crayon" look like the one to the left. We have given you links to both methods so you can choose which one works better for you. I also think the pastel colors are prettier, which can be achieved by using a limited amount of food coloring...."a little dab will do ya".

Tender Crumb has a wonderful cake recipe that will be great for this layered rainbow cake ( just add the necessary food coloring for each layer)but be mindful of the amount of food coloring, you don't want the cake to be bitter.

Southern Coconut Cake
Makes an 8-inch triple layer cake
Recipe by Tender Crumb


For the cake:
5 large egg whites
½ cup of milk
2 teaspoons of vanilla extract
3 cups of cake flour
2 and 1/3 cup sugar
4 ½ teaspoons of baking powder
½ teaspoon of salt
2 sticks of unsalted butter (8oz.) at warm room temperature
1 cup unsweetened coconut milk
2 ½ cups of sweetened flaked coconut for garnishing cake

-Preheat the oven to 350F degrees. Butter the bottoms of three 8-inch round cake pans. Line the bottom of each pan with a parchment circle and butter the circle.
-Put the egg whites in a bowl and whisk slightly. Add the ½ cup of milk and the vanilla and whisk to mix thoroughly; set aside.
-In a large mixer bowl, combine the flour, sugar, baking powder, and salt. With the mixer on low, beat dry ingredients well in order to break up any lumps. Add the butter and coconut milk on low speed and beat just to combine. Raise the speed to medium and beat until light and fluffy about 2 minutes.
-Add the egg white mixture in 2 or 3 additions, scraping the sides of the bowl after each addition. Divide the batter among the pans.
-Bake for 30 minutes or until a cake taster inserted in the middle comes out clean. Allow the cakes to cool in their pans for 10 minutes. Then turn the cakes out and place on a wire rack to cool completely.
-To assemble the cake, place one layer, flat side up, on an 8-inch cake round. Cover this layer with 1 cup of the buttercream frosting. Spread it evenly all the way to edge of the cake. Then sprinkle ½ cup of shredded coconut on top. Add the second layer and repeat the process. Top with the final layer of cake and frost the top and sides of the cake.
-Place the remaining 1 ½ cups shredded coconut on a large baking tray. Pick up the cake and hold it on the palm of one hand over the tray. Using the other hand scoop up the coconut and press it to the sides of the cake. Continue with this process until the sides of the cake are covered. Set the cake on a serving plate and sprinkle any remaining coconut on top of cake. Chill cake for at least one hour to allow frosting to firm up a bit.

Cream cheese buttercream frosting
12 ounces of cream cheese, slightly chilled
1 stick of butter plus 6 tablespoons of butter (7 ounces) unsalted butter at room temperature
1 cup of confectioners sugar, sifted after measuring
2 teaspoons vanilla extract
1 cup granulated sugar
¼ cup of water
3 egg whites

-Place the cream cheese in the bowl of a mixer and beat on medium speed until slightly fluffy and smooth. Add the butter 1-2 tablespoons at a time, mixing until smooth. Add the confectioner’s sugar and vanilla and mix until fluffy. Set aside at room temperature while buttercream is made.
-Combine the granulated sugar and water in a small heavy saucepan and bring to a boil over medium heat, stirring to dissolve sugar. Continue to cook without stirring until the syrup reaches the softball stage 228 degrees F on a candy thermometer.
-Meanwhile, place the egg whites in mixer bowl and have the mixer ready to go. When the syrup is ready, turn the mixer on med-low and begin mixing the egg whites. Slowly add the hot syrup to the whites taking care not to pour onto the beaters, it may splash. When all the syrup is incorporated, raise the speed on the mixer to med-high and beat the egg whites until mixture has cooled and stiff meringue forms.
-With the mixer on low, begin adding the cream cheese mixture by the spoonful. When all is incorporated, raise the speed to medium and whip until frosting is smooth and fluffy.
________________________________________________________________

For those of you who want the easiest way to make this cake as well as what I call the "marbled" version , head on over to this tutorial by Omnomican. She made her lovely rainbow cake with the box mix and the "one pan/all color" method. Take note of the special FAQ's at the bottom of her post, which addresses common issues one has with baking this cake. I do want to reiterate one though..... the more food coloring you use,the bitter it will be. A little goes a long way so have an easy hand when making your colorful concoction.

There are actually several recipes and methods that you can use to make these rainbow cakes, but if you are not a great baker you can still achieve this witha minimum of work. Just take the regular box cake, decide what method (layer or marled) to make and add the appropriate food coloring. You can then just buy regular canned frosting to frost the cake. The following are some that I think are good. Look them over and use the ones that work best for you.
REMEMBER: IF YOU ARE DOING THE LAYERED VERSION TO BAKE THE LAYERS THIN, SINCE YOU ARE STACKING SEVERAL TOGETHER....YOU DON'T WANT THE CAKE TO BE TOO TALL.

GREAT RAINBOW CAKE RECIPES:

Martha Stewart Rainbow Cake: Good ole' Martha has done it again, take note of the great lemon buttercream icing recipe as well.
Baked Bree- This is a 4th of July , red and blue cake, but it can be adapted for the Rainbow cake.

Read more
Monday, January 25, 2010
Chocolate Transfer Cupcake Favors


When I came across the recipe for
Chocolate Transfer Sheet Cupcakes from Sweet and Saucy, I thought they were cute as well as they also looked so yummy. What a great party favor to get or give...you eat the dessert then take home the cup.

Transfer sheets, or "transfers" (the patterns that are decorating the top of the chocolate disc in the picture) are sturdy but flexible plastic sheets coated with a mixture of cocoa butter and FDA approved food coloring and etched with repetitive designs, such as golden swirls. They come in a wide variety of designs and colors. Some transfer sheets have a single color, like gold.

The following are some resource links for this
item, but of course you may know some in your local area.

{TRANSFER SHEETS}:
Amazon Transfer Sheets
Fancy Flours
Country Kitchen Sweetheart
Sugar and Craft


{CUPS}:
Target ( the local $1 bin in the housewares section)
Dollar Stores
Family Dollar


photo courtesy of Sweet and Saucy
Read more